Users
This guide will take you through everything related to the management of Users in Keystash.
Info
Users in Keystash become users on your servers. In the documentation for Server Management we discuss how users are assigned to servers, but for the purposes of this document, when we talk about a User in Keystash we are referring to anyone who needs to access the Keystash Site and your servers.
Add Users
Users need to be added to Keystash to be able to create and upload SSH Keys and to gain access to your servers.
- Click "User Management" on the menu and then "Users".
- Click the "Add User" button at the top of the table.
- Enter the users details into the form and select their appropriate role. A role determines the permissions the user has in the Keystash Web Application, not on your Linux servers. You can read more about roles and permissions here.
- The Email address is used as the username for when the user logs into Keystash Site.
-
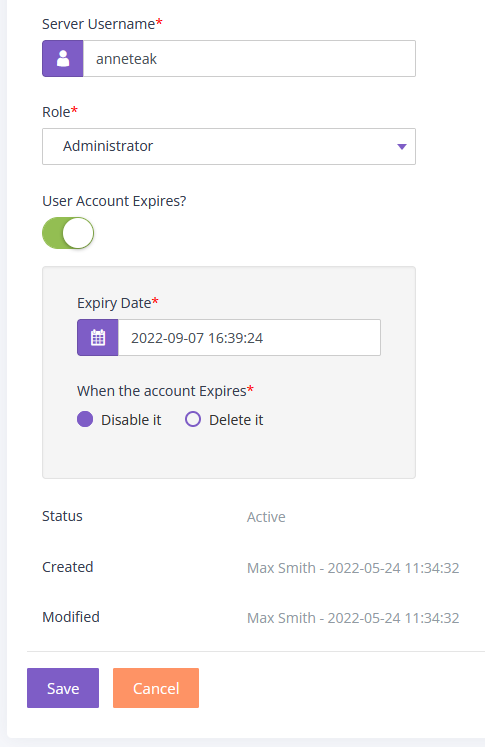
The Server Username field is the username they will use to login to Linux servers. This is automatically generated from their first and last names, however you can override that with any value you require.
Note
Usernames should only use characters accepted by most Linux distributions. See here for more information on this subject.

-
If you would like to create a temporary account for a contractor or short-term user, then simply turn on the "User Account Expires?" setting and choose a date and time. Account expiration is explored in more detail here.
- When you save the users details they will be sent a welcome email to get on-board Keystash. The user will need to verify their email address and then they will be prompted to create a password for their account.
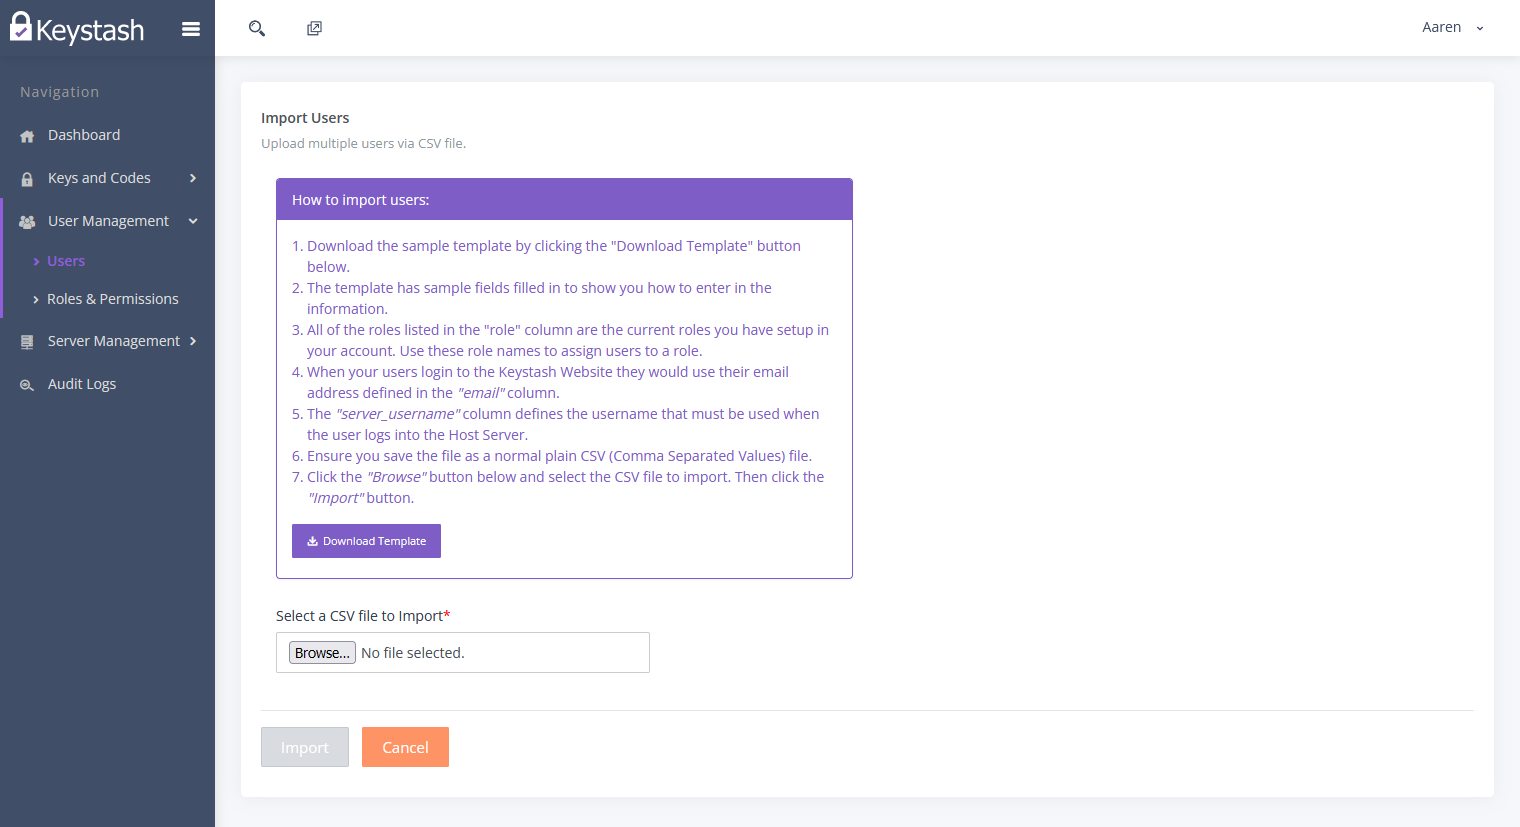
Importing Users
Users can be imported in bulk from a workforce management system. The import supports standard CSV (Comma Separated Value) files and we have a template that you can download to get you started.
- Click "User Management" on the menu and then "Users".
- Click the "Import Users" button at the top of the table.
-
Click the "Download Template" button and save the file when prompted by your browser.
-
Open the file in Microsoft Excel or Google Sheets (or similar tabular file editor). Google Sheets will automatically open the file correctly.
Note
Excel may not open the file correctly depending on your computers regional settings. See here to resolve this issue.
-
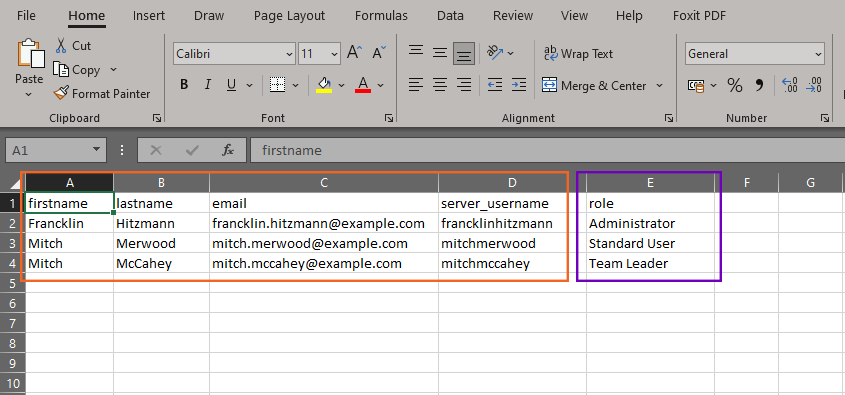
Enter the users details into the file. The first row is the header row and should not be modified. The columns are:
- firstname - The users first name.
- lastname - The users last name.
- email - The email address is used as the username for when the user logs into Keystash Site.
-
server_username - The username the user will use to login to Linux servers.
Note
Usernames should only use characters accepted by most Linux distributions. See here for more information on this subject.
-
role - The role the user will have in Keystash. This determines the permissions the user has in the Keystash Web Application, not on your Linux servers. The file is automatically populated with all the roles you currently have (see the area circled in purple in the diagram below). You can copy and paste them as required.
- Note: The data circled in orange below is example data that you may delete from the file.
-
Save the file (ensure it stays as a CSV file) and then click the "Browse" button in Keystash to upload the file you just saved.
- The file will automatically be read and checked. A File Preview will be shown with some of the data in your file. Use this to check that the correct data is in the correct columns.
- You can now click the "Import" button at the bottom of the screen. Your file will be imported and the users will be invited via email to connect to Keystash. Any errors will be displayed, in which case you will need to edit the file and re-upload.
Edit Users
- Click "User Management" on the menu and then "Users".
- Click "Edit" in the actions column of the user you would like to edit.
- Enter the users details into the form and select their appropriate role. A role determines the permissions the user has in the Keystash Web Application, not on your Linux servers.
- The Email address is used as the username for when the user logs into Keystash Site.
-
The Server Username field is the username they will use to login to Linux servers. This is automatically generated from their first and last names, however you can override that with any value you require.
Note
Usernames should only use characters accepted by most Linux distributions. See here for more information on this subject.
-
The users account can be set to automatically be disabled or deleted at a certain date and time. Click "User Account Expires?" and set the date and time. Account expiration is explored in more detail here.
- Click "Save" once you have completed editing the User.
Delete Users
- Click "User Management" on the menu and then "Users".
- Click "Delete" in the actions column of the user you would like to delete.
- Click "Yes, please!" when prompted.
Warning
The user account and SSH keys will be removed from all Linux servers and the user will no longer have access to Keystash or any Linux servers. Their user home folder on each Linux server will be backed up to "/home/keystash-removed-users/{username}"
Account Expiration
Keystash can disable or delete a user account at a certain date and time. This is useful for contractors or short term access requirements.
- While Adding or Editing a user account, click "User Account Expires?"
-
Set the Expiry Date and Time.
Note
The expiration will take place at this time in your local time zone.
-
Select if you want the account to be disabled or deleted. Disabling an account leaves it in Keystash in a disabled state, whereas deleting it would permanently remove it from Keystash.
Warning
When the account is Disabled or Deleted, then the respective user account and SSH keys will be removed from all Linux servers and the user will no longer have access to Keystash or any Linux servers. Their user home folder on each Linux server will be backed up to "/home/keystash-removed-users/{username}"
Disable & Enable Users
Users can be temporarily disabled and then re-enabled instead of deleting the user account.
- Click "User Management" on the menu and then "Users".
- Click "Disable" or "Enable" in the actions column of the user you would like to Disable or Enable.
- Click "Yes, please!" when prompted.
Warning
The users account and SSH Keys will be deleted from your servers, however the account will remain in the Keystash Site. Their user home folder on each Linux server will be backed up to "/home/keystash-removed-users/{username}"