Servers
This guide will take you through everything related to the management of Servers in Keystash. The servers discussed here refer to any virtual machine, container or host that is running a Linux distribution with an SSH server.
Server List
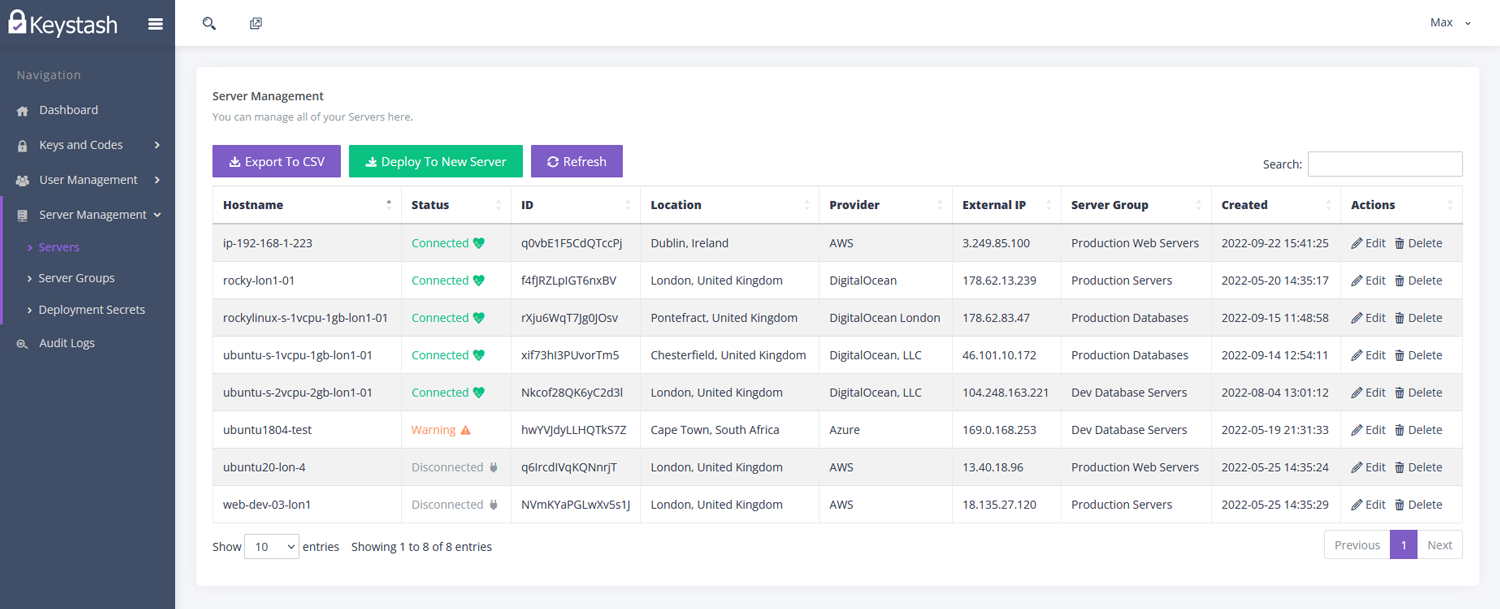
- The server list shows the status and details of all your servers that are connected to Keystash. Click "Server Management" and then "Servers" to view the list.
-
The following columns are shown in the list:
- Hostname: The hostname as set on the server.
- Status: This shows the status of the server within the last 5 minutes. The 3 different states are detailed here.
- ID: This is a unique ID that represents the server. This ID is used in the configuration of the server, in the API and any any audit logs.
- Location: This details the general geographic location that the external IP address is registered to based on the ASN as provided by the owner of the IP.
- Provider: This details the provider or company that the external IP is registered to. This will typically be your cloud hosting provider such as AWS or DigitalOcean. However it can also be your ISP if the server is co-located at your offices or private data centre.
- External IP: The external IP address as detected by Keystash when the server registered with our systems. Note that the IP could be NAT'd or proxied, in which case it would represent the IP address of the NAT gateway or proxy server. This in turn would affect the Location and Provider fields as discussed above.
- Server Group: This is the Server Group in Keystash that the server has been assigned to during registration. You can always move a server to another Server Group by editing the server.
- Created: The initial date and time the server was registered.
- Actions: Any available actions that can be run against the server.
Add Servers
Servers are added to Keystash by deploying the agent software on the server. Once the agent has been deployed the server will register with Keystash and automatically show up in the Server list.
- Click "Server Management" and then "Servers"
-
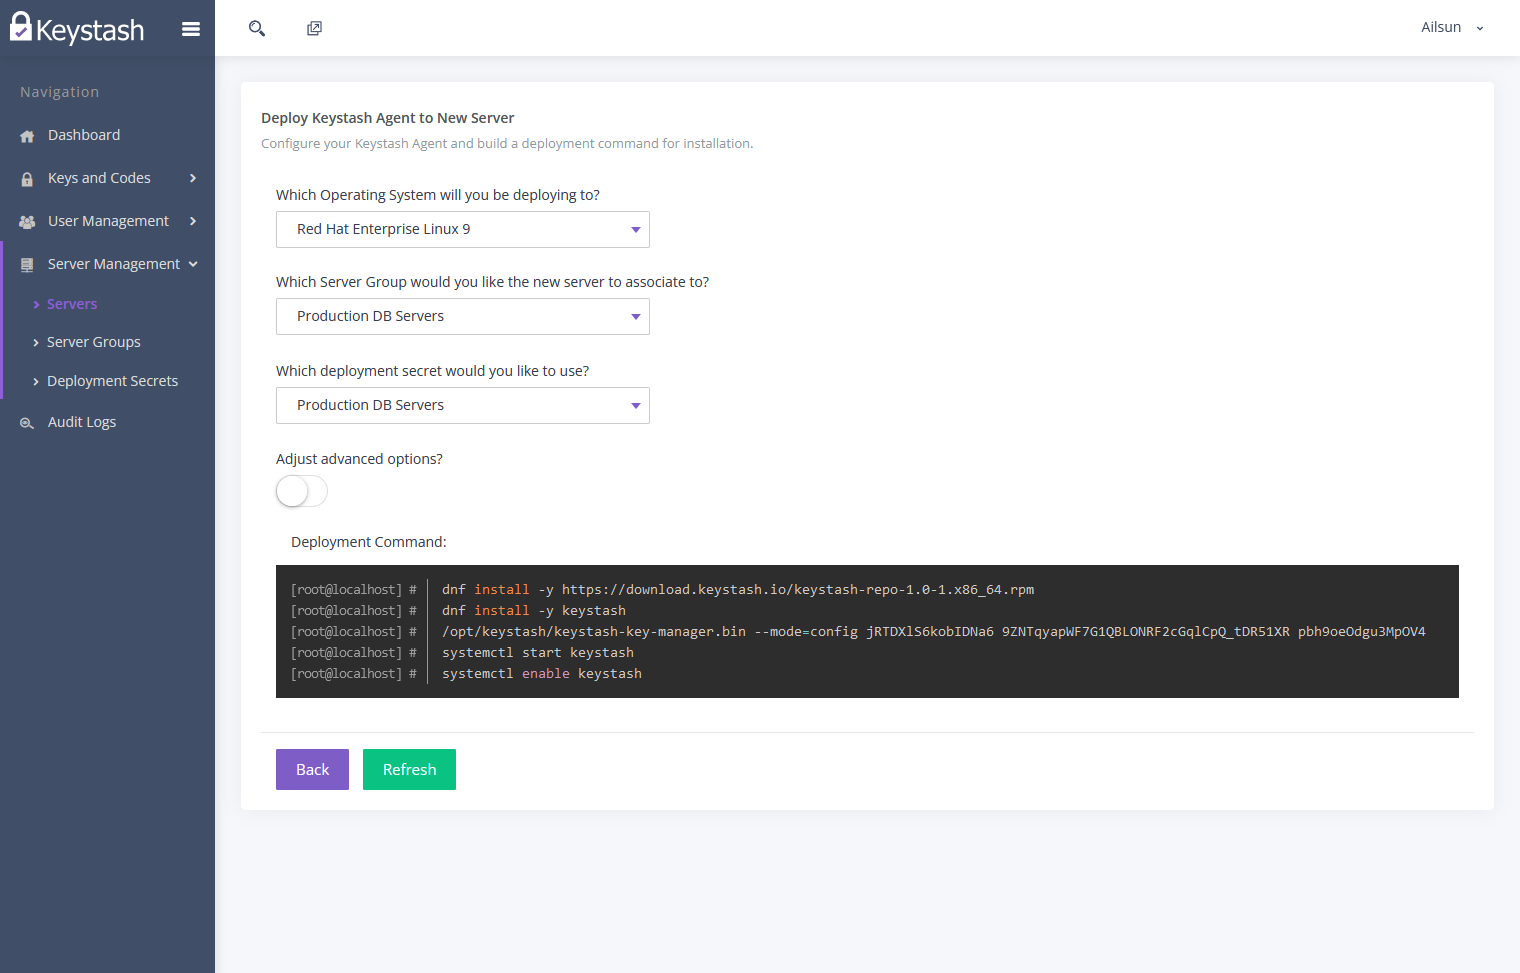
Click "Deploy To New Server" at the top of the table
-
Select the "Operating System" that the server is running. This will adjust how the agent is deployed to the server (YUM or APT Repo)
- Then select which "Server Group" you would like to assign the server to. Server Groups are logical groupings of servers that share the same users, groups, privileges, SSH server settings and SSH keys. For example "Production Web Servers" would typically have the same user accounts and settings. Therefor grouping the servers together allows you to assign settings to the group as a whole instead of individual servers
-
Now select the "Deployment Secret" you would like to use for this deployment. A Deployment Secret is simply a password that the Keystash agent will use to authenticate with your Keystash account. We recommend creating multiple Deployment Secrets and using a particular secret for a particular Server Group. For example if you had the Server Group called "Production Web Servers" you would create a Deployment Secret called "Production Web Servers" and you would only use that Deployment Secret for that Server Group.
Note
If a Deployment Secret is compromised then you would need to disable or delete it. This would mean that all servers that were deployed with the Deployment Secret would no longer be able to authenticate and synchronise with Keystash
-
You can tell the Keystash agent to use a proxy server by clicking "Adjust advanced options". Provide the full details of the proxy server by giving it a detailed URL such as "https://proxy-server.example.com:8443"
-
Lastly copy the "Deployment Command" and paste this into the terminal of your Linux server or add this to your automation tool such as Ansible or Chef. TIP: You can use the "copy" button that shows in the right hand corner of the Deployment Command when you hover the mouse over this section of the page
Warning
The Keystash agent will overwrite any user accounts that already exist on the server and in Keystash. The agent will also modify your SSHd and PAM configurations, therefor we strongly recommend you test your deployment on a new blank server first and only then on a live server.
-
You can use this deployment command for multiple servers of the same Linux distribution. These servers will all use the same Deployment Secret and Server Group
Edit Servers
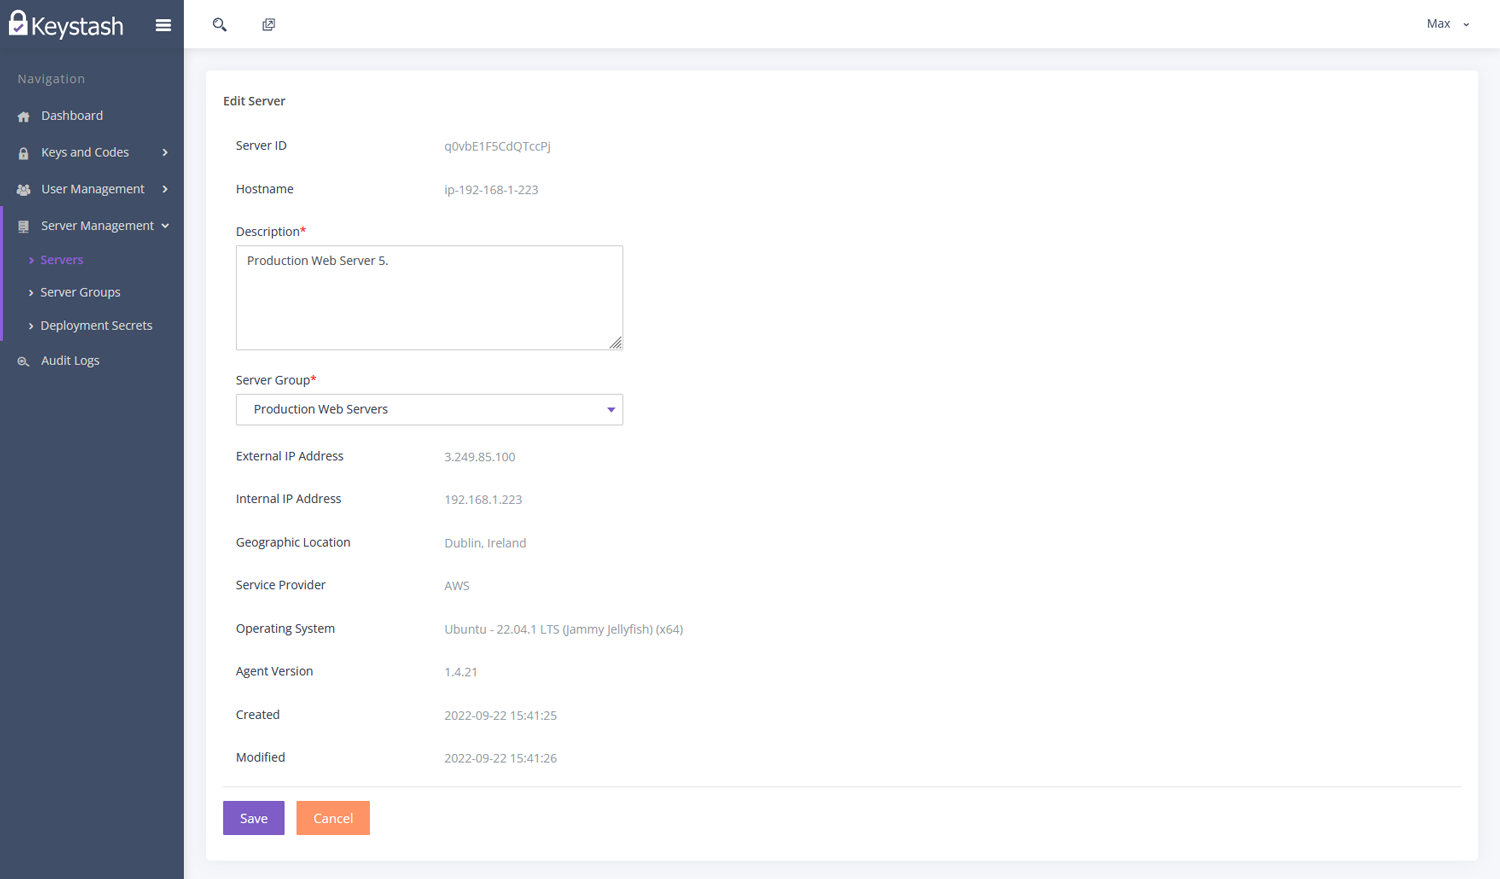
At any time you can change a server's Server Group assignment and description. To do this:
- Click "Server Management" and then "Servers"
-
Click on "Edit" in the "Actions" field for the server you want to edit
-
Adjust the Server Group or Description as required
- Click "Save" to save your changes
Warning
When changing the Server Group assignment, all the users, groups, privileges, SSH server settings and SSH keys will adjust to the new Server Group settings. If a user has an active session on a server and their privileges are removed by the new Server Group then their active session will disconnect.
Note
The Server Edit view shows additional server information such as: Internal IP Addresses, Linux Distribution details and the Keystash Agent version.
Delete Servers
Once a server has been decommission in your environment you may want to clear it out of Keystash.
- Click "Server Management" and then "Servers"
- Click on "Delete" in the "Actions" field for the server you want to delete
- Click "Yes, please!" when prompted
Warning
Deleting a server that is still active with the Keystash agent running will simply re-create the server in Keystash. If you want to continue to have the server up and running but not connected to Keystash, then first uninstall the agent and then delete it from Keystash.
Server Status
Any server registered with Keystash will show one of the three following states. You can use these states to determine if the Server is correctly configured to work with Keystash and is actively synchronising users and SSH keys.
- Connected: This means the server and the Keystash agent has correctly connected to Keystash within the last 5 minutes and has synchronised all changes to users, groups, permissions and SSH keys
- Disconnected: This means the server and Keystash agent has not connected at all within the last 5 minutes and it is not synchronising any changes to users, groups, permissions and SSH keys. Either the server is off or the Keystash agent is failing to connect to the Keystash platform at https://server-api.keystash.io
- Warning: This means that the server and Keystash agent has attempted to connect to Keystash within the last 5 minutes but is either not up to date with the latest changes or is still busy synchronising the latest changes. Servers will typically not stay in this state for long so refresh the list to determine if the server becomes Connected or Disconnected
Export To CSV
You can export your full list of Servers with all associated details to a CSV file.
- Click "Server Management" and then "Servers"
- Click "Export To CSV" at the top of the table
- Your CSV export will begin and it will be offered as a normal file download
-
Open the file in Microsoft Excel or Google Sheets (or similar tabular file editor). Google Sheets will automatically open the file correctly.
Note
Excel may not open the file correctly depending on your computers regional settings. See here to resolve this issue.